
Introduction
Content creation has come a long way in the last decade. It's gone from being something of a cottage industry to being a career (either part-time or full-time) for upwards of 200 million people.
With this increase in creators comes a need to create videos that are as professional as possible. This means people are turning to tools that were once mainly used by studios, like teleprompters. These devices allow creators to not only seem more confident when filming, but reduce the number of takes caused by forgotten lines, etc. They give you the ability to create studio-quality content from home, without having to invest in studio-level infrastructure (perfect for when you're just starting).
It can be daunting, though, to figure out what you need for a teleprompter. We've put this guide together to answer all the questions you likely have going into purchasing your first teleprompter.
What is a Teleprompter?
A teleprompter is a device that allows people on camera to read from a script, without having to rely on cue cards or notes in their hand. It's made of mirrored glass that sits in front of the camera and a device that allows text to scroll. The mirrored glass allows the person in front of the camera to read from the teleprompter while maintaining eye contact with the camera at all times.
Teleprompters have been around since the 1950s and have primarily been used in broadcast studios (like news channels), for speeches, or presentations. However, with the rise of YouTube and other personal video channels, they're becoming more common for everyday video-making settings, like at home.
Why use a teleprompter?
As we mentioned above, teleprompters are largely used as a way to stick to a script when recording a video or doing a presentation. Typically, when recording or presenting on camera, you want your hands free for a natural on-camera appearance. You don't want to be holding a script or fumbling with note cards. You want to be able to convey the information in a way that seems natural, even if you're reading off a script. Not only that, but with cards or a script, you're looking down, not at the camera. You want to come across as confident and an expert at what they're talking about. Stumbling, stammering, and otherwise pausing so you can flip through notes or try to recall what you were talking about can make you seem less authoritative.
Teleprompters help eliminate this problem, by putting the words you're reading right in front of the camera, so you're always looking at the camera, even if you're reading. You may not even have a script that you want to follow, per se. You can load your teleprompter with bullet points or talking points that follow the general flow of what you're trying to talk about. This helps further reduce the feeling that someone is simply reading a prepared script and allows you to create a more off-the-cuff feeling to your videos.
The rise of YouTube and social media platforms means that more and more people are starting to use teleprompters outside of big studio settings. These creators have a script that they want to follow while recording their videos without looking like they're reading. The end goal is a studio-quality look, no matter where you're filming (like from your home). As a result, teleprompters are becoming something that can work with nearly any kind of camera, meaning that even a built-in webcam can work.
Beyond that, teleprompters have a host of less traditional uses, such as:
Sales calls - This is a prime example of a situation where you need to have all the answers and seem confident in what you're saying, without giving the appearance of reading a script. Think about it. Any time someone pitches you when they're clearly reading from a script, it's obvious. The dialogue feels wooden and everything has the same cadence, which can feel like the salesperson isn't actually interested in the call. With a teleprompter, you can have talking points scrolling by, so the salesperson can hit all the right points without sounding like a robot. This is particularly critical in today's age of video sales calls and demos.
Key information in a video - If you are a YouTuber (or content creator using a different video platform) you'll sometimes want to completely adlib what you're saying, but you still need to remember critical pieces of information. Teleprompters can help with this by allowing you to keep that information front and centre, so you can refer to it when you need to. This is great for situations like cooking shows or science demonstrations, where you need to follow a specific recipe (or formula), but otherwise want to keep things light from a narration/presentation point of view.
Webinars/Presentations - This is a fairly modern need, as far as video creation goes, but when you're doing presentations or webinars over the internet, teleprompters can help you hit all your talking points (or stick to your script) without seeming like you're reading from something off camera. Even when you're using a built-in webcam, if you're reading from a script that's on screen, you won't be looking directly at the camera. Your eyes will be tilted slightly down and they'll be moving all over the place as you read. With a teleprompter, you eliminate both issues by having all the information directly in front of the camera.
Speeches/lectures - This one probably isn't going to come up very often, but with speeches (like a commencement or graduation ceremony where you want to make sure you're pronouncing student names correctly) or lectures that are being recorded, you still want to create the feeling that someone isn't just following along on their notes. You want them to make eye contact with the camera, to look at the people they're talking to to create the illusion of it being more intimate than it is. There are specific teleprompters that work in these situations, and we'll touch on these a little later, so if this is your use case, you need to make sure you're buying the appropriate kind of teleprompter.
How does a teleprompter work?
Teleprompters are surprisingly simple in the way they're put together. They use something called beam-splitter glass, which is a kind of mirrored glass that allows you to see the words on the prompter, while also allowing you to film through the glass.

It sounds confusing, but basically what happens is the mirrored side of the glass reflects a screen located below it. The words appear on the screen and are reflected by the glass so you can read them. The camera is mounted behind the glass and can film the person in front of it, without capturing the words.
Some styles of teleprompters don't require a camera, but they work the same way. The person on one side of the glass can see the words, but from the other side, all you see is a clear pane of glass.
How your camera attaches to your teleprompter
The answer, of course, depends on the kind of teleprompter you're using. Some of the smaller, lighter prompters hang off the front of your camera lens. We don't recommend this for zoom lenses because they extend in and out and the extra weight can damage the internal lens mechanisms. If you're using anything more than a cell phone hanging on a fixed-length lens, we suggest something with a bit more support - or you'll need to use supplemental support for the prompter so there isn't too much stress on the lens.
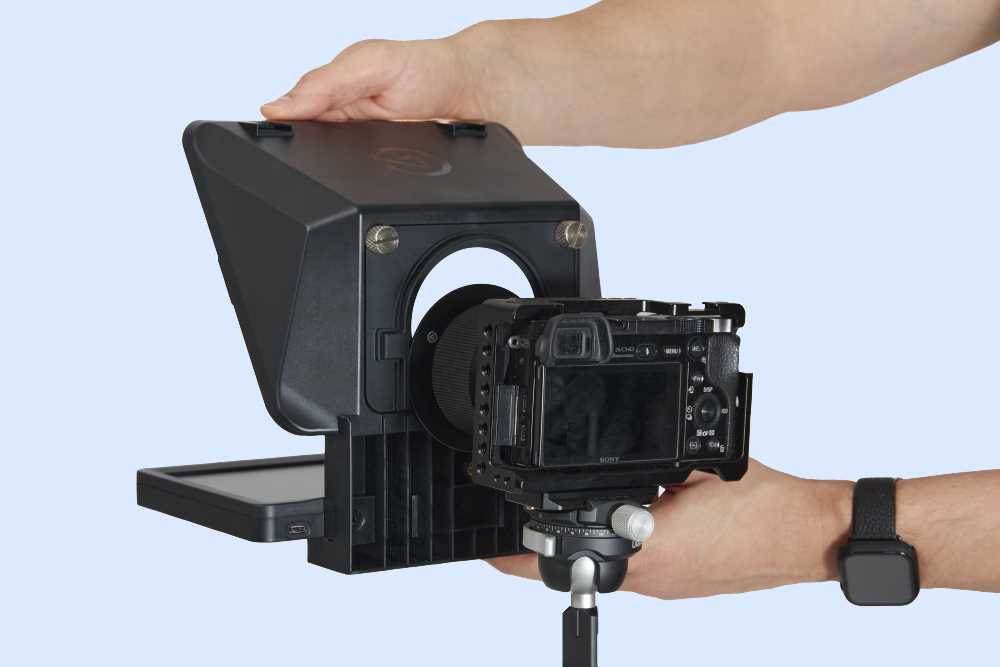
Most mid-size teleprompters provide a platform or bracket on which your camera can be mounted on top of the teleprompter. This style of mount can handle more weight without putting stress on the front of your camera lens.
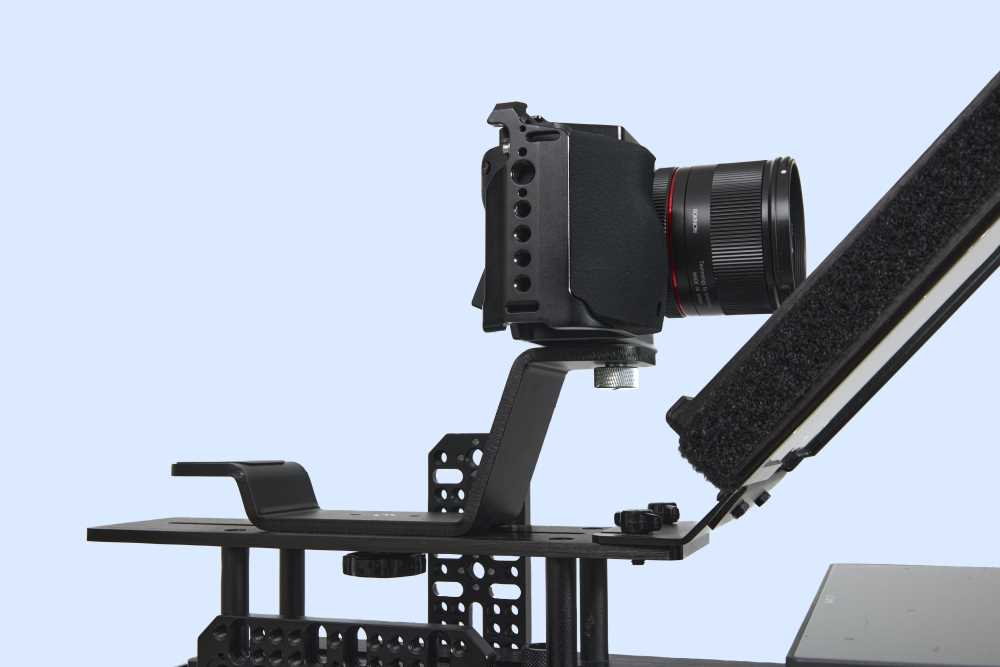
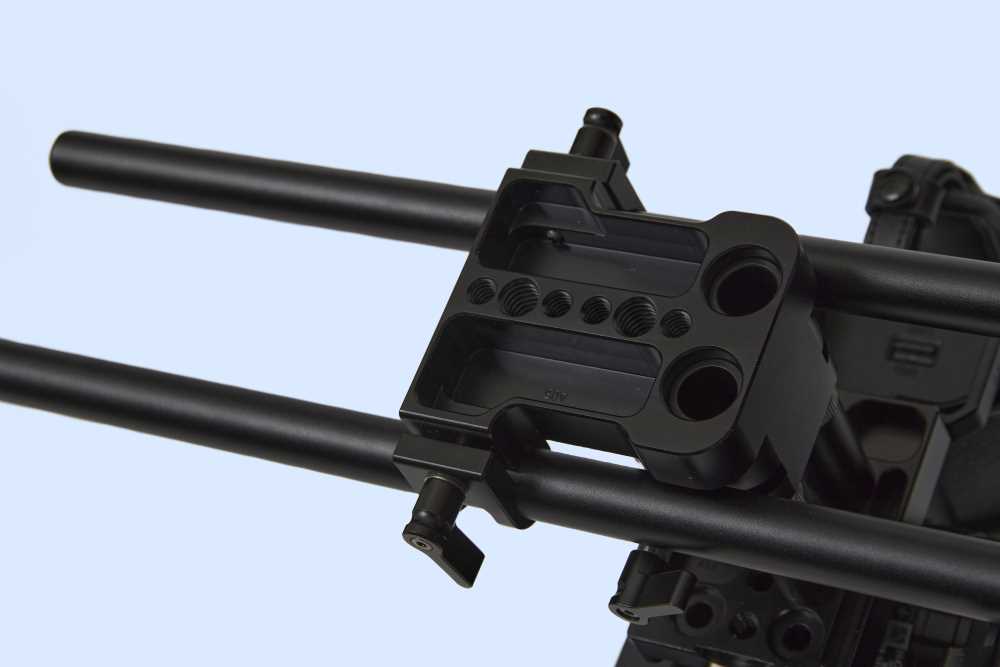
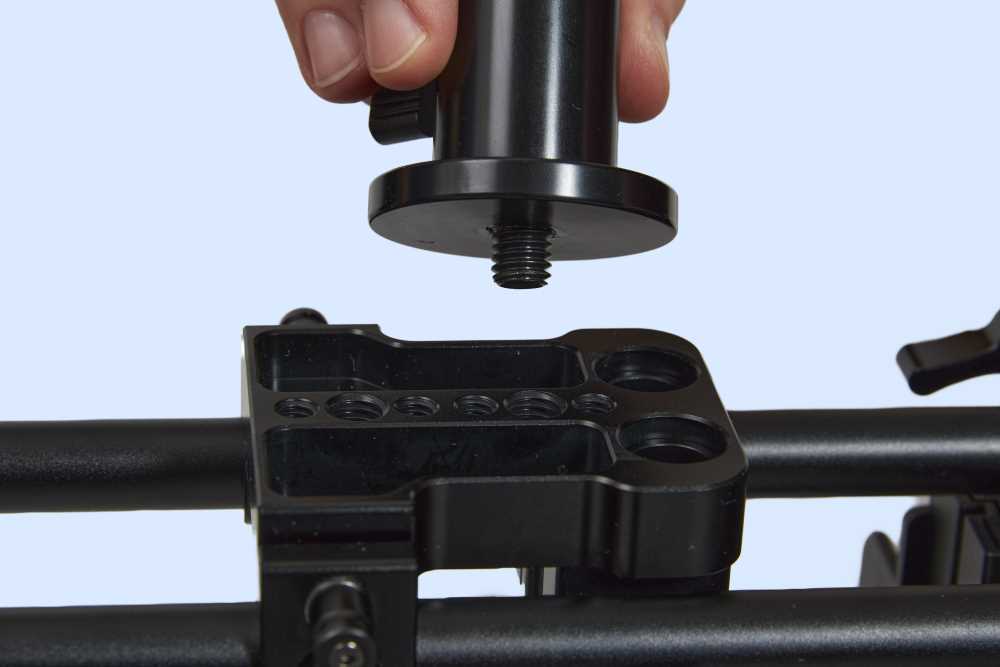
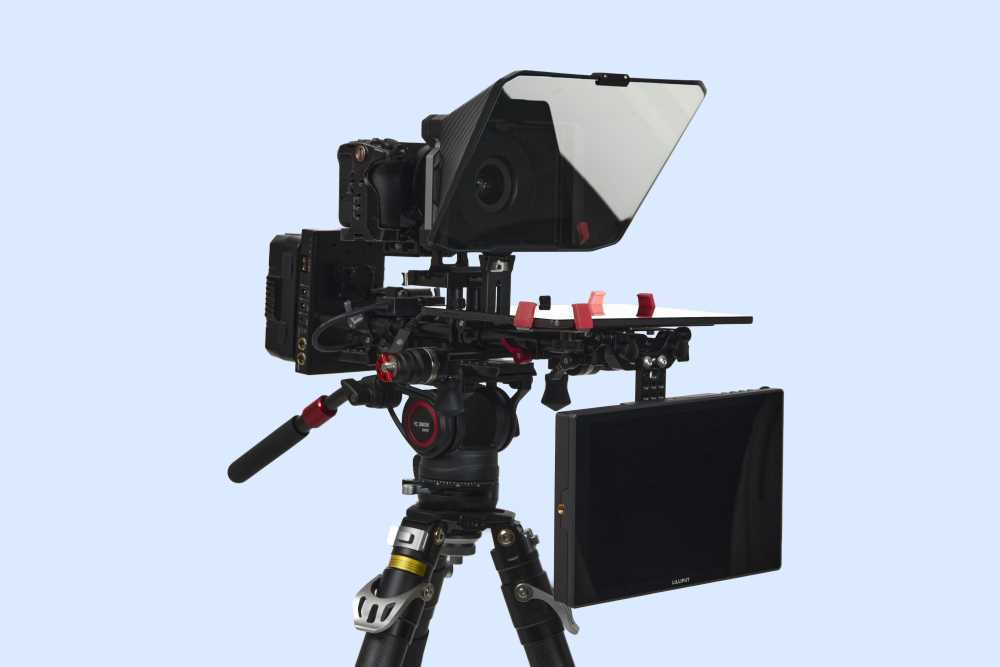
When you reach the pro tier of teleprompters you can start considering teleprompters with 15mm “rails”. This industry standard in video space has two 15mm aluminum or carbon fiber rods running the length of your rig that attachments can be added to. The centerpiece is your camera mounted to some kind of 15mm rail block or base plate. From there, the possibilities are limitless. You can mount everything from portable v-mount battery packs to magic arms, even teleprompters. This is handy for attaching more accessories like wireless mic packs, wireless video transceivers, audio recorders, or additional video monitors for the camera operator. 15mm rods are kind of like the Lego of camera rig builders.
PHOTO: Camera on 15mm rails attached to prompter
How your camera lens connects with the prompter
There are a few ways you can connect your teleprompter to your camera. The method usually depends on the make and model of your teleprompter. The methods you can use are:
Lens mounted: Teleprompters sit in front of the camera and attach to the lens using a lens mount, a metal ring that screws onto your lens filter threads and then snaps into the teleprompter. This allows you to maintain access to the lens's controls, like focus or aperture. However, you need to have the right size adapter for your lens's filter thread size (diameter). If they don't match, you'll need a thread-size adapter ring to match your lens to the prompter mount. Zoom lenses can present a challenge if the distance from your camera mount to the lens ring is either fixed or not that easily adjustable. An internal zoom lens that doesn't change focal length the way a mounted lens does will be much more ideal for use with a prompter if you need zoom. Given the range of lenses available with internal zoom, a lot of users just go for a fixed prime lens instead.

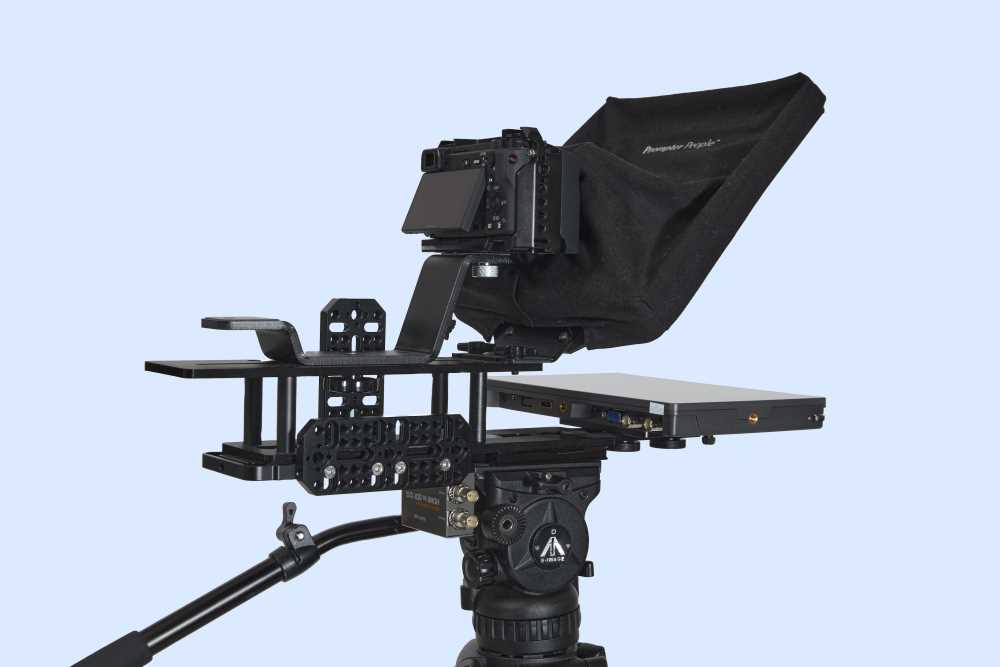
The Elgato Prompter attached to a Sigma 16mm lens via a provided adapter ring that screws onto the front of the lens. Hood or sock/cloth: This is a piece of material that covers your lens like a sock or is a full hood over the entire camera. This style has very wide compatibility with virtually any camera brand and lens size. But it can be tricky if you are not using autofocus to get your camera positioned and focused just right and then slip on the teleprompter covering without bumping anything. This style is pretty universal for all lens types.
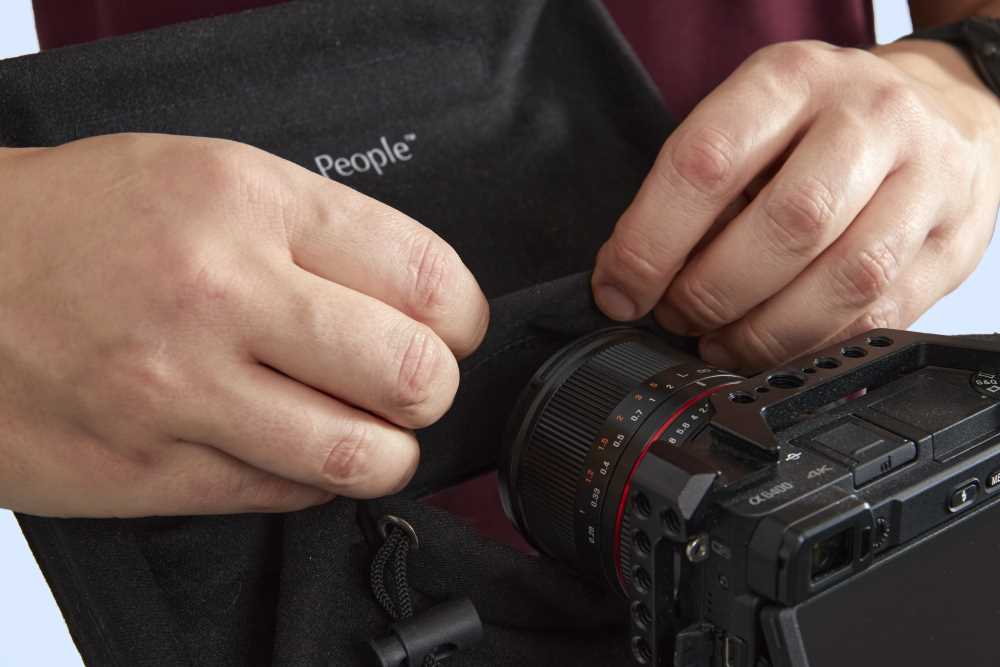
A prompter hood cloth either covers the whole camera or more often has a sock shaped opening that covers the camera lens. A drawstring on the sock allows it to be tightened up around the lens. Full enclosure: This is a special case mostly for Pan-Tilt-Zoom prompters. These contain the camera inside a box enclosure built around the camera and the beam-splitter glass.
Photo: Prompter People PTZ prompter
How your teleprompter attaches to the tripod or c-stand
Many prompters have 1/4-20 or 3/8-16 thread holes on the bottom plate that lets you attach a standard tripod adapter plate for mounting the teleprompter to a tripod. The camera is usually attached on top of the prompter, so it's raised up a little bit and more in line with the center of the mirror glass rather than the very bottom.
For prompters with these 1/4″ or 3/8″ thread holes, you can screw a baby pin adapter into them to allow you to place the prompter onto a c-stand - often separately from the camera.
What are the different kinds of teleprompters (and when should you use them)?
The first thing you need to think about before you even start looking at teleprompters is the kind of content you'll be producing. Teleprompters are designed for specific purposes. But they're not tied to those purposes, per se. You can get away with using them for slightly different purposes, but you'll discover that there are limitations that exist for each one.
Camera mounted or studio teleprompter
This is your standard teleprompter. It's probably what you're imagining when you think of them. This style of teleprompter mounts directly to a camera in a studio. It's more robust than some of the other kinds and typically isn't super mobile (you can move them around, but you have to break them down). This robustness gives you more points of adjustment to get the mirror angle and the distance from the monitor to the mirror just right (among other things). Studio models often let you move the monitor in and out and up and down relative to the beam splitter. It also allows for a more precise range of angle options on the beam splitter glass. Lighter, more portable prompters, on the other hand, often have a fixed 45-degree angle beam splitter and a fixed distance from the monitor.
Photo: Camera mounted or studio teleprompter
This is the kind of teleprompter you want if you've got a mostly permanent setup, like a studio or a specific place you record in your house.
Floor or stage teleprompter
Floor teleprompters are a very different setup from camera-mounted teleprompters. For starters, they're a freestanding unit. They also don't necessarily require a camera. This style of teleprompter is often used by performers, like stage actors or musicians, who need help remembering either their lines or their music.
Photo: Floor or stage teleprompter
You're mostly likely to use something like this if you record something that has a performance aspect to it, like you're recording musicians as part of your YouTube content (say you focus on music and musicians, similar to someone like Rick Beato).
Pan Tilt Zoom Camera teleprompters
Pan Tilt Zoom (PTZ) refers to cameras that have a built-in method for remotely controlling where the camera is pointed by adjusting the pan, tilt, and zoom through software or a remote joystick.
Photo: PTZ teleprompter
PTZ -compatible teleprompters are usually more box-like, allowing the camera inside to move around while staying 100% behind the teleprompter mirror. This allows you to add movement to the video feed without having a live camera operator panning and tilting the entire teleprompter assembly. This is desirable in public settings where the teleprompter is likely unattended somewhere in the audience in front of the stage, like religious gatherings or places of worship. The camera being fully contained in a black box and controlled remotely is much less distracting than having a camera operator panning and tilting a camera rig around during the presentation.
Freestanding teleprompter
Freestanding teleprompters are a little different from the other kinds we’ve looked at so far. With this setup, you’ve got a camera on a tripod (or another kind of stand) and, in front of the camera, you’ve got a teleprompter on a second stand. This style allows for more mobility when you’re shooting because it’s easier to separate the camera from the teleprompter to get different angles or styles of shots. It also allows you to adjust the camera angle independent of the teleprompter.
Photo: Freestanding teleprompter
Presidential teleprompter
Similar to the floor teleprompter in that it’s a freestanding unit, the presidential style of teleprompter isn’t likely something that you’re going to use unless you’re filming speeches in front of a live audience. The presidential teleprompter has two mirrors made from beam-splitter glass, one closer to the ground and another closer to the presenter. Much like other styles, the text is only visible to the person reading, not the people on the other side of the glass.
Photo: Presidential teleprompter
This style of teleprompter is often used more for live settings than recorded ones, which is why the device is designed to be less conspicuous and allow for better eye contact across the audience.
Software Prompter
Software teleprompters that use your existing laptop or desktop screen without a beam-splitter glass aren’t true teleprompters aren’t true teleprompters, per se, but the good thing about these is that they’re either cheap or free. But, you’re limited to using your phone, computer, or tablet to record because it’s not a true teleprompter. If you’re not recording with a device that places the camera behind your display, you end up with eyes looking all over the place, rather than straight at the camera, like a teleprompter is designed to do. This creates that disconnect we mentioned earlier around the content feeling less personal without eye contact. Having your teleprompter on the same screen as all your other apps (slide decks, messaging software, email, etc.) can also be distracting when compared to a dedicated second display for the prompter.
Photo: Software teleprompter (Fluidprompter on a laptop screen)
Software teleprompters on your existing laptop or desktop monitor are a great way to start experimenting with prompters, but are not necessarily a strong long-term solution.
Everything you need to consider when buying a teleprompter
Ideally, you want to end up with something that lasts a while, so you don’t have to keep purchasing expensive equipment. It helps to carefully consider all the factors that can potentially impact your business when choosing your teleprompter.
Some of the big factors that you need to consider before you even look at a teleprompter are things like budget, use cases, and filming location. For each of these factors, it helps to think about both where you are right now and where you plan on being in the future. If you’re just starting out and your budget is small, your options are kind of limited to what you can afford, especially in the early days. However, if you’ve been doing it for a while and you want things to be more professional, then you’re better off thinking seriously about making the right investment for professional-level results.
With equipment like this, you want to buy the best you can afford that’s going to serve your needs both now and in the future. It’s not the biggest hassle to have to buy multiple prompters as things change, but it helps to buy something that’s going to work for your current situation, but will serve you as you grow. This way you can keep up with production and not stop every six months because you need new equipment.
Also think about what your plans are, as far as filming locations and setups. You’re probably starting with a smaller, home-based setup. If that’s something that you plan on sticking with long-term, buy the best prompter for that situation. However, if you know that you’re going to end up either renting studio space or even just moving to a bigger location in your house, you’ll need to account for that as things like distance from the camera and the kind of camera that you’re using are factors you need to consider.
We’ve broken this down into sections to make it easier for you to find the information you’re looking for. Let’s dive into everything that you need to think about before you buy a teleprompter.
Teleprompter brands and pricing
Brands
If there’s one place you’re going to get lost in the details, it’s likely deciding which brand of teleprompter to buy. As you may have noticed, there are a lot of options out there, and, at first blush, they all seem very similar. However, the closer you look at them, the more you see that some brands stand out more than others and that some brands do certain things better than others.
We’ll go into which brands are best for certain things later, but for now, here’s a brief breakdown of the major brands.
Prompter People
- Founded:
- 2003
- Headquartered:
- Campbell, California, United States
Prompter People have been around since 2003 and started up as a way to get affordable teleprompters into the emerging world of online video creation (YouTube was a couple of years away, but the market still existed back then).
This California-based company has come a long way since then. They still offer solid entry-level devices, but have since expanded to serve more upscale markets. Their devices run from as low as $200 to upwards of $11,000, depending on the kind of prompter you’re buying. Their devices come with a three-year parts and labour warranty on hardware and a one-year warranty for monitors. Customer service is based here out of North America. On top of that, PrompterPeople hardware also has excellent repairability, and replacement parts are available in case of any accidents.
Ikan
- Founded:
- 2005
- Headquartered:
- Houston, Texas, United States
Ikan is another North American brand that started around the same time as Prompter People (2005). The biggest difference between the two brands is that, while Prompter People started as a way to help people get affordable teleprompters, Ikan focuses on high-quality video production gear of all kinds (including teleprompters). You can get their teleprompters for just under $200 and prices go up to over $7,500.
They provide a one-year warranty for the first end-user (meaning the person who purchased the product new).
Glide Gear
- Founded:
- 2010
- Headquartered:
- Myrtle Beach, South Carolina, United States
The final North American brand we’re going to look at here. Similar to Ikan, Glide Gear started in 2010 and has a broad focus on all things related to video production. Similar to Prompter People, their goal is to make video production equipment accessible to everyone, from the beginner to the seasoned pro. Their teleprompters start around $150 and top out around $800. These prompters are a good place to start with mid-range equipment. They’re a step up from lower-tier teleprompters. However, they’re not as polished as the next level up. This means setup and teardown can be a slower process than some of the higher-tier models.
They also provide a limited lifetime warranty for their products.
Elgato Gaming
- Founded:
- 1999
- Headquartered:
- Munich, Germany and California, USA
While Elgato has been around a long time, they only just entered the teleprompter space in 2023. Despite the recent entry into the prompter space, Elgato is well known for live-streaming computer peripherals including webcams, microphones and control surfaces like the Stream Deck.
SmallRig
- Founded:
- 2013
- Headquartered:
- Mongkok, Kowloon, Hong Kong or Shenzhen, Guangdong, China
SmallRig is one of the top Chinese manufacturers of all things related to video production. They have one teleprompter that sits around $200 and makes a good entry point as you’re starting to get serious about production. Like a lot of entry-level options, SmallRig teleprompters are great if you don’t mind having to either fiddle around to find the ideal setup for you or do some tinkering to make sure it fits with all your equipment. If you want to use anything bigger than a small tablet for a monitor, though, you’ll need a different unit.
Desview
- Founded:
- 2003
- Headquartered:
- Shenzhen, Guangdong, China
Finally, there’s Shenzhen-based Desview. This company has a wide range of teleprompters all in the sub-$100 to around $400 range, making them another strong contender if you’re looking to get a starter teleprompter. Like the others, you may need to fiddle around with them a bit to make them work with the equipment that you have. They aren’t as compatible with all devices as the high-tier prompters are. They are widely available through Amazon, though, which is great if you’re not based in North America.
Neewer
- Founded:
- 2011
- Headquartered:
- Shenzhen, Guangdong, China
Neewer is a Chinese-based brand that has subsidiaries around the world to help serve its customers. Their focus is providing quality video production gear beyond just teleprompters. Their products are priced low enough (around $200 +/- $100) to be a good starting point for folks who are starting to get more serious about video production. Neewer offers products that are great for getting started, but sometimes require a lot of fiddling to get things working just the way you want them due to the build quality.
Their products come with a one-year warranty and the purchaser is responsible for any shipping that’s needed.
Pricing
Like a lot of production gear, you can pay as much or as little as you want to for it. As you can see above, there’s no shortage of options at just about every price point.
When thinking how much you want to budget for a teleprompter, you have to consider not just where you are today, but where you hope to be in the future. It’s not the end of the world to have to purchase a new one six months from now when you grow, but if you’re busy enough that you’re growing, you probably don’t want to have to wait around for an order to show up.
The best advice is to get the best teleprompter that you can afford. Beyond that, think about your plans for growth. If you’re a one-person show today, do you plan on growing a team down the road? Are you hoping to use multiple cameras in the future? Think of all of these details (and more) as you’re considering your purchase.
Physical Design
Transport case or packaging
The kind of packaging you get for storing or transporting your teleprompter depends on the quality of the teleprompter you buy. Cheaper teleprompters usually only have a cardboard box with precut foam inside to hold the various pieces. Middle-tier prompters will include a reusable zippered cloth bag with precut foam inside to hold the prompter pieces. At the higher end, you may get a hard case similar to a Pelican case that may even have some extra space inside to store accessories such as teleprompter remotes or cables.
If you are frequently shooting at customer locations, think about getting a teleprompter rig that can remain fully assembled and dropped directly into a camera bag or carrying case. This drastically cuts down on the time you spend on setup and take down on site. You’ll need some careful planning of your camera rig build to make sure everything fits in your chosen camera bag or hard case.
Mobility
Are you working from a single space all the time or moving around to different locations? This is a question that’s probably going to come up more in the early days of making videos, but it’s something that you need to consider. If you’re always moving around, something portable is going to make your life easier. You don’t want to have to spend hours (or however long it’ll take) to set up and break down a complex set up every time you record.
Even if you’re a part-timer with a semi-permanent space, odds are you can’t just leave everything set up all the time. You need to consider these factors.
Like a lot of things, you should think about where you’re at and where you want to go. If you’re going to keep it as more of a hobby, you’ll probably want something that breaks down quickly when you’re not using it. However, if you have plans to scale things up, you may want to buy something that’s less mobile to help build out a proper studio space. Larger heavier prompters often have more adjustability to change the mirror angle and distance from the monitor/iPad. For example, something like the PrompterPeople “ProLine Plus” costs a lot more, but you can adjust almost every aspect of it from mirror angle to monitor distance and even monitor moving in and out along the other axis to compensate for panning/tilting your camera/prompter.
If you have a studio, especially when you’re working with multiple cameras, you’ll find it more useful to have a full-featured teleprompter with a lot of adjustability. Not only do you end up with something that is sturdier, but you also have something that’s more versatile, like the Prompter People example above.
Assembly methods
Some prompters require tools for assembly, even if that’s as simple as a set of hex keys or a flathead driver. Some premium options have prompters that can be assembled and disassembled without any tools, which is convenient for mobile use on a customer location.
Some prompters need to be disassembled into a dozen or more pieces for packing and transport, while others easily fold flat and drop in a case with minimum effort. Consider how important the assembly/disassembly time is for your use case.
Accessory Attachments
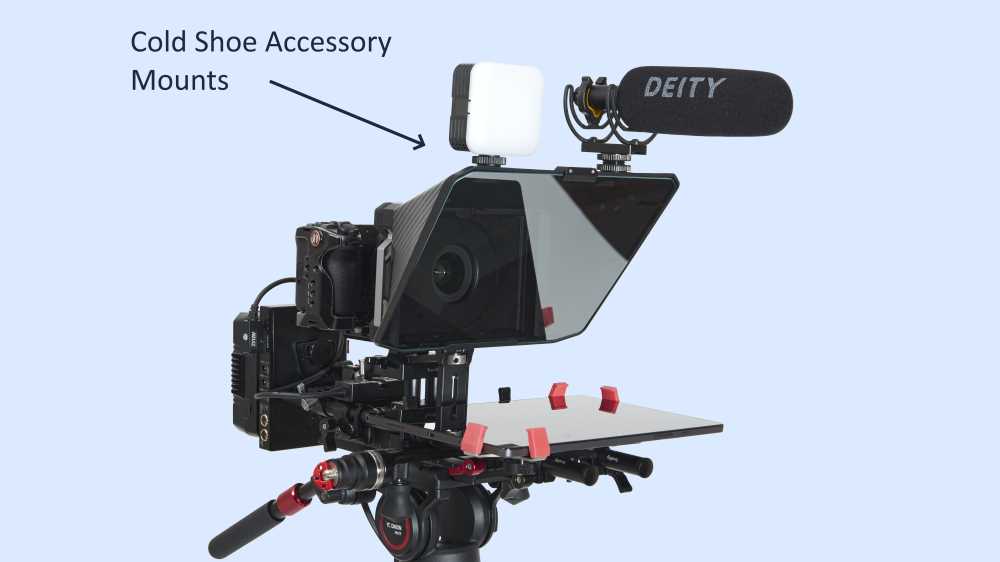
In a home studio or office studio environment, you’ll likely want to have all the equipment mounted on one stand or one desk to save space (compared to having a bunch of stands all over the place). For example, you may wish to have the microphone and maybe even a small light mounted to their teleprompter all on one stand. Some prompters will allow you to mount other accessories to it such as a microphone or small video light via a “cold shoe” attachment point.
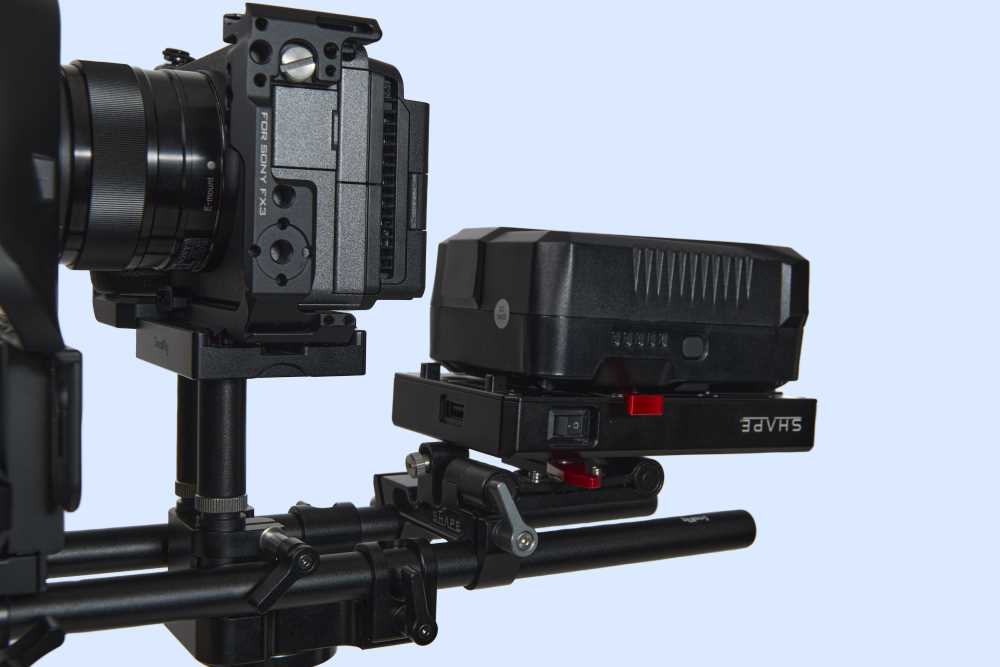
For prompters built around 15mm rails, it’s easy to add a v-mount battery plate for portable operations.
Some prompters allow you to easily attach a “confidence monitor” or “talent monitor” below the front of the prompter as a 2nd display facing the talent. This 2nd display often shows the current program video feed so the talent is aware of what they look like on camera. It can also be used to show supplementary information like a presentation slide deck or a “multi-view” which is a grid of all cameras in the set as well as some basic information about whether you’re live on the air, recording or not, and how your audio levels are. Not all prompters support attaching a confidence monitor or talent monitor. Usually, the more premium offerings will have this option available.
Setup
Mounting types
Mounting depends on the kind of equipment you’re using. This doesn’t just mean the teleprompter itself, this includes all the accessories, like your monitor, lens, camera, etc. If you’re using a tablet or a phone, you need to make sure that your mobile device is compatible with your teleprompter.
The good news is that many teleprompters can be mounted on top of the tripod, and then have the camera mounted on top of the teleprompter. So the prompter is now holding your camera while sitting on your tripod.
The kinds of videos you’re doing can also affect what you buy. Mounts can be handheld if you’re filming a lot of videos on the go or doing man-on-the-street style videos (or recording in nature away from the studio). As with many things, you need to think about specific use cases both present and future, and purchase something that’s going to help you for a while (unless you don’t mind doing this work again and again). For example, if you’re mostly doing stationary filming now, but you know you plan to use a gimbal down the road, it’ll save you time and money to buy a teleprompter you can mount on a gimbal. Similarly, if you’re using a dolly, a camera mounted on tracks, say you’re doing talk show-style videos, you’ll need to ensure compatibility with your teleprompter. Finally, if you’re using a jib for any shots, maybe for keynote speeches similar to Apple, you’ll also want to mount the teleprompter to the jib.
Adjustability
When you first start out, adjustability isn’t likely to be a major concern. You’re probably in a home setup using a camera at eye level. However, as you grow, you may find yourself needing to adjust certain aspects of your teleprompter.
The big one is being able to adjust the angle of the glass to compensate for different camera angles. This is important if you’re working with people of different heights or cameras that are closer or farther away from the presenter. Another consideration is being able to move the monitor to accommodate different camera angles. For example, if you tilt the whole teleprompter down, you may need to change the angle of the mirror and move the monitor in/out/up/down. A fully adjustable prompter will accommodate a very wide range of camera angles. Lower-cost teleprompters will be more geared towards a straight on eye-level shot.
Photo: Adjusting teleprompter mirror angle
Balancing your teleprompter
This isn’t going to be an obvious consideration, but you may need to move the teleprompter forward or backward on your mount so that it is evenly balanced. If your prompter is either too front-heavy or too back-heavy, it won’t be stable and may fall over. Some prompters have a built-in mechanism for sliding the device forward or backward on the mount. Others may provide multiple threaded holes on the bottom for attaching a tripod mounting plate at more than one position. However, some only have one mounting position. If it isn’t balanced well enough with your equipment attached, you may need to buy a longer tripod plate to compensate.
Beam splitter glass
This is probably the single biggest consideration you need to take into account when looking at teleprompters. Beam splitter glass is used in teleprompters because it allows you to see the words on the monitor in a way that prevents the words from being seen by the camera behind the glass.
Photo: Beam splitter glass
Most teleprompters use what’s called 70:30 beam splitter glass. This means the glass transmits 70% of the light that passes through it to the camera. Enough to see you on the other side, but not enough to see the words on glass. The second number (30 in this case) represents the amount of light reflected up from the monitor (or iPad, etc.). The glass typically sits at a 45-degree angle to catch the light from the monitor. Other formulations are 65:35 and, less commonly, 50:50. Something like 65:35 would make the text brighter from the presenter’s side. And, because the beam-splitter glass isn’t transmitting 100% of the light through to the camera, it’s effectively a neutral density filter (kind of like sunglasses for your camera). You’ll need to increase your camera exposure a little bit compared to not using a prompter at all.
With cheap beam splitter glass, you can end up with something called ghosting. Ghosting is when the words on the glass blur as they scroll by. What's happening is the light from the monitor is reflecting off both the front surface of the beam-splitter glass and the rear surface of the same glass. A higher quality beam splitter glass will have a higher optical quality glass as well as a higher quality mirror coating both of which improve visual clarity and reduce any distortion or coloring of the image.
Photo: teleprompter ghosting
Ghosting will become less noticeable if you increase the distance between your eyes and the prompter. You may not have the ability to do this in certain filming situations, like if you’re filming from your desk or a small room in your house, when you can, try backing up a little bit and using a longer focal length to reduce ghosting (as well as increasing direct eye contact).
On its own, beam splitter glass reduces ghosting by using a reflective coating on the front of the glass (the side you look at). This is one of the areas where it doesn’t hurt to invest a bit more money in a teleprompter. The optical quality of the beam-splitter glass and mirror coating will be so much more crisp when you invest in higher-quality glass. This might just be an optional bonus upgrade. But, if your eyesight isn't great and you need maximum clarity, you'll want to choose a higher-quality teleprompter.
The shape of the glass should be considered as well. Rectangular glass is best for straight-on situations, where you’re looking directly at the camera. However, trapezoidal, or studio Glass, was made for TV productions with more than one person in front of the camera (think news broadcasts or sports talk shows). The glass slops outwards allowing for a wider view angle and off-axis viewing. You can look at different cameras or have people reading from an angle without losing words.
Photo: Beam-splitter shapes: rectanguler and trapezoidal
Aspect Ratios
Aspect ratios are something you may typically only think about from the other end of production when thinking about things like the kind of camera that you’re using or what kind of device your videos may end up on. But, from a teleprompter perspective, aspect ratios are an important consideration.
Devices have an aspect that determines how video shows up on the screen. The common aspect ratios are 4:3, 16:9, and 9:16, although some devices use different ratios. In the earlier days, it was thought that a 4:3 aspect ratio helped maximize how many lines of text you could have on screen without being too wide. Beyond that, your eyes would move back and forth more noticeably. However, this was also during a time when prompter software generally filled an entire screen. You couldn’t narrow the content width for the text in the software. You needed a physically narrower screen.
These days 16:9 is far more common and is the default computer monitor aspect ratio. This is much more natural when, for example, using the teleprompter for online meetings with Microsoft Teams or Zoom, as well as showing a Slide Deck presentation with software like PowerPoint. Modern teleprompter software, like FluidPrompter, can adjust the displayed content width in software for script reading so it’s not too wide for your combination of camera lens and distance.
For maximum versatility, we recommend a 16:9 aspect ratio. It works with all use cases, and then adjust your teleprompter software to use a narrower content width to minimize lateral eye movement if you are closer to the camera or using a wider angle lens.
Aspect ratio matters for your teleprompter because if your device uses an aspect ratio that isn’t supported by the teleprompter you’re going to end up with “letterboxing”, black bars that are placed on two sides of the screen and squish your content into the available screen space. If it’s too big, you’ll be able to see the presenter’s eyes moving as they read the words.
Ideally, you want a teleprompter that has adjustable margins. This way you can use the aspect that both makes the most sense for your use case (maybe you want it bigger if you’re using a teleprompter for sales calls, which are usually up close) and that’s adaptable to the device you’re using as a monitor. If you can find one with adjustable margins (like FluidPrompter), buy a bigger one than you think you need so you can scale down to the appropriate size. This helps you keep using the same teleprompter for any kind of content you want to create, from close-up YouTube-style commentary videos to bigger, studio-based productions.
Sizes
This might seem like a small consideration, but make sure that you buy a teleprompter that fits the device you’re going to use as a monitor. Built-in monitors are no longer the default or even required. Technology has progressed to the point where most of us walk around with perfectly good monitors in our pockets. You can use your phone, a computer, or a tablet (like an iPad), making it easier than ever to get started with a teleprompter.
Most teleprompters will tell you the dimensions of the mounting brackets, so all you need to do is make sure whatever you’re using fits. Typically mounting brackets are as follows:
Photo: 3 teleprompters, phone, tablet, 24" screen
- Phones brackets are 5 to 7 inches
- Tablet brackets are 7 to 12 inches
- Monitor brackets are 12 to 24 inches
Also, specific brands of teleprompters will only work with specific mounts, especially when it comes to lenses. You need to ensure compatibility with any prompter you’re going to use. Many teleprompters fit over the top of your lens, kind of like a sock. This makes it hard to use a follow focus with a manual focus prime lens. Most people either set the focus once in the studio for a fixed distance from the subject or choose to use a good autofocus lens and camera so that no follow focus is required.
Lens compatibility
Even in the beginning, when you’re probably limited to using whatever lens you have available (like your phone or computer’s webcam), you need to make sure that you’re working with a teleprompter that is compatible with your lens.
This is a situation where you need to think about both what you have and what you hope to get down the road. Before you buy, make sure you know what the widest lens you can use with the teleprompter is.
Along with not being able to use your lens and teleprompter together if you don’t have the right adaptors, you also risk something called vignetting. Vignetting is when you end up with some blockage in the corners that is visible in the camera’s video recording. You end up with an effect that’s not unlike trying to look through a binocular, which can ruin your shot.
Photo: Vignetting through teleprompter
Camera lenses and filters
Lenses
It’s pretty easy to get lost in the weeds when thinking about lenses. There are so many options and things to consider that it can quickly become very overwhelming when you’re just starting out.
Ideally, what you’re going to be looking for is something with a longer focal length (the focal length is the “mm” number attached to the lens), so that you can sit further back from the camera and the teleprompter. This kind of setup will help reduce the amount of eye movement that is picked up by the camera. However, if you’re working with a limited amount of recording space, set the font size to only 2-3 words per line and narrow the content width so it's closer to the width of your lens.
As we’ve mentioned above, not all prompters will work with all lenses. Specifically wide angle lenses on physically smaller prompters may catch some of the prompter in its view. For example, the super popular Sigma 16mm f1.4 lens can work with some phone-size prompters but might catch part of the prompter in its view. If you are using a wide-angle lens, you'll need to check compatibility before you order your prompter. You may even want to consider moving up to a tablet size or larger prompter to make sure your wide-angle lens doesn't see the edges of the teleprompter mirror.
Something you’ll need to consider is whether you want a prime lens or a lens that has autofocus. Prime lenses are lenses that have a fixed focal length. This gives you the ability to get the same exposure with a faster shutter speed. These are good for things like controlling depth of field and shooting in low light. Typically, prime lenses are used in manual focus mode, with some prime lenses only being available in manual focus. Autofocus, as the name implies, automatically adjusts the focus of the lens. What you decide to get will end up being a personal preference more than anything else. Most cinematographers prefer manual focus lenses for precise control, while YouTubers get best results from an autofocus lens and camera with a strong autofocus algorithm (which makes sure that the camera doesn't follow the wrong subject on camera).
Filters
Two types of filters are often used with a teleprompter: a neutral density (ND) filter and a black pro-mist filter (diffusion filter).
A neutral density filter reduces the overall light making it to your camera lens and helps when shooting in direct sunlight (or a very well-lit video studio). You'll also need a high-brightness prompter display, too, in high-light situations. The black pro-mist filter is a diffusion filter, available in a number of strengths, that softens the image. Depending on the type of content you are making, the overly sharp ultra-high-definition video of modern cameras may be a bit too harsh. The black pro-mist filter lets you get a soft, more cinematic look. This also creates an effect similar to Zoom’s digital appearance feature that hides minor wrinkles and blemishes and smooths skin.
For many prompters your only choice is to place circular filters on the front of the camera lens, which can interfere with prompters that use a ring mount. To avoid this, you can get a step-up ring and use a larger diameter filter size than your lens. This avoids vignetting when stacking multiple filters and rings on the front of your lens. For prompters that use the cloth sock style covering for your lens, a filter will be 100% compatible but can also be a nuisance if you want to put it on and take it off frequently (even just to test different strengths of black pro-mist diffusion in your current environment).
A few special prompters have a unique feature that supports easily removable filter trays. These can be inserted and removed without disassembly. If you frequently use filters, this is something to consider when you have the budget for it.
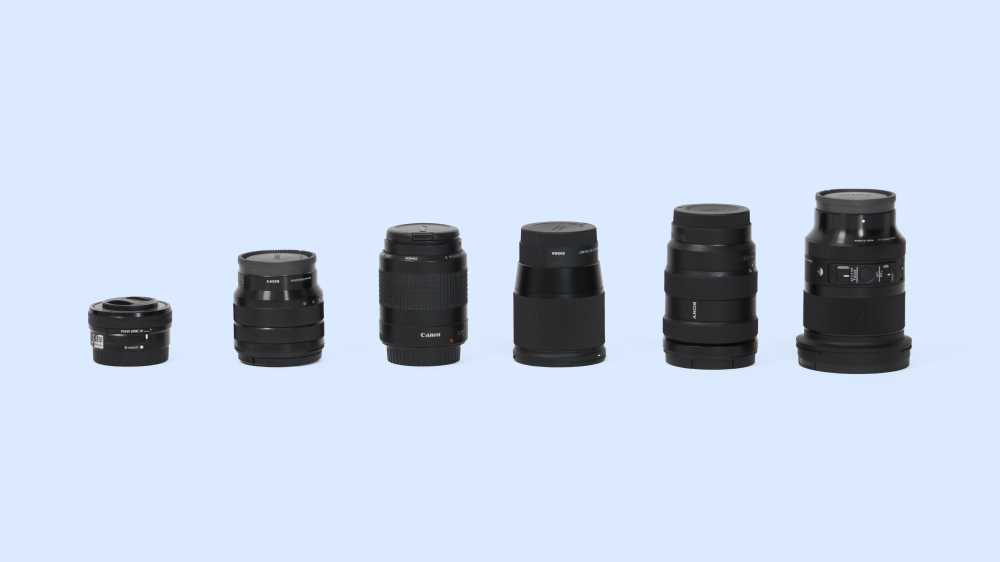
Lenses we recommend
For lenses, you can’t go wrong with the Sigma 16mm f1.4. This is the #1 lens choice for YouTubers starting out. It’s great for shooting in smaller rooms, but can be too wide for some teleprompters. You’ll need to check to make sure you don’t get vignetting.
Similarly, the Sony SEL1655G 16-55mm f2.8 is also a good contender. The 16mm focal point for filming in smaller spaces and the ability to adjust the focal length means you can get tighter shots when you need them.
Teleprompter display
Tablet or smartphone
Tablets or smartphones make it easy for you to get started with a teleprompter. You can get all the features you need, without having to spend the extra money on a monitor (which is ideal when you’re starting out).
Monitor
A monitor is a dedicated unit for your teleprompter. It’s designed to be used with teleprompters. Monitors are helpful when you need your phone or tablet to do other things while you’re filming.
Monitors are generally more powerful than a general purpose tablet. They provide higher brightness levels than tablets, which is ideal for filming with sunlight in the room or filming outside or just have a lot of bright studio lights. Monitors are also available in larger sizes than tablets. If you need a really big prompter for a big presentation room (further distance from the presenter), a monitor is the way to go.
Purpose built teleprompter monitors have a built-in flip function so that everything displays the right way on the beam-splitter glass mirror.
Monitors can also be used for more purposes than just scrolling text on a screen. For example you can put a zoom meeting or other web meeting on the screen to maintain eye contact while delivering a webinar, course, or other live instruction content. In a studio setting, the monitor can also be switched between different uses live without the audience knowing. For example the video crew could start with a countdown, switch to a script, and then switch to a zoom meeting before coming back to a script. You'll need a professional monitor with multiple video input types so that it can connect to video switching equipment like the Blackmagic Design Atem line of switchers.
Wiring and power
Power source
Teleprompters need a power source to operate the display. With phones or tablets, this would be the internal battery. You need to remember that having your display on all the time at high brightness will kill the battery much faster than usual. An external wired charger or portable battery pack to keep your device fed helps a lot here and also reduces the wear and tear on the device caused by deep battery discharges.
If you’re using a teleprompter with a monitor for the display, you may need a plug-in nearby. Better prompters should support an external DC input for battery power. In the mid-tier that may be a non-locking 12v barrel jack. This works with a lot of portable battery packs out there. But the more premium offerings will feature locking power connectors and accept a wide input voltage for maximum compatibility. The locking connectors are helpful because it prevents the plug from coming out while filming (or when moving gear between shots).
In a fixed studio space, the power source probably doesn’t matter a lot. But if you are on the go, choosing a teleprompter monitor that works well off battery power will give you the flexibility you need.
Monitor Connection Type
If you’re running your teleprompter off a mobile device (tablet, phone, etc.) you may not need to worry about a video connection. However, if you want to synchronize multiple devices or at least a laptop with a tablet, you’ll need a teleprompter app that supports network sync.
When using a built-in monitor display, there are a lot of options for connecting it to a computer or other video source. The oldest option is VGA, which is well beyond its years these days, but can still be found on a lot of equipment. The classic VGA connection doesn’t support a high monitor resolution, but can easily be run for 100ft or more with a quality cable (one reason it still exists).
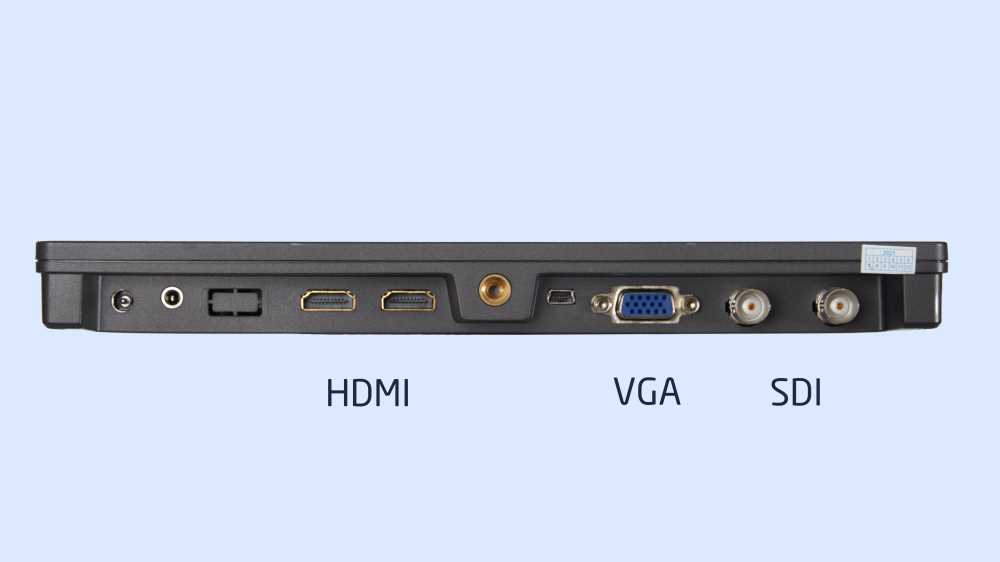
HDMI should be very familiar by this point and is the most common method for attaching monitors to computers or game consoles to TVs these days. HDMI supports higher resolutions but can’t usually run longer than about 15ft without quality loss. If you need more distance between your prompter monitor and the computer running the software, the modern long-distance champion is SDI video. SDI connections are only available on professional-level prompters.
A few new options are starting to show up in the market for running video over a network connection such as NDI. However, because of the complexity that comes with it, we don’t recommend an NDI prompter unless you’ve already gotten to the level of professional SDI prompters and are ready to try network teleprompters using NDI.
Teleprompter apps
At some point in your journey, you’ll need to look at how you’re getting the text to scroll across the screen with your teleprompter.
There is, of course, no shortage of options when it comes to what you use here. If you’re using a phone or tablet, there are dozens of options on the app stores. When deciding what to use you need to assess a few criteria:
Device – This is always the first thing to think about. What device are you using? Anything with a screen and an app store should work. If you’re just getting started, working with a tablet or your phone is probably a safe bet, unless you’re recording with your phone. The big considerations here are making sure that you can find an app that serves your needs and that you find a teleprompter that fits your device.
Not all teleprompters work with all devices. Some devices don’t fit, while others may require a very specific aspect ratio, as mentioned above.
Budget – You can get started using a free app, but they’re pretty limited in terms of what you can do. Some have limits on the number of characters you can use or the length of your videos or some insert a watermark, for example. What’s good about the free apps is that they give you a way to test the waters to see which one best suits your needs.
Paid versions will be subscription-based $X.XX/month kind of thing. It won’t be a lot, but you’ll need to consider the cost. One thing to consider is that teleprompter apps that have a monthly cost usually provide cloud services that really help with collaboration and sharing on top of the teleprompter features. For example, allowing synchronization between multiple prompters together or making live edits to your teleprompter script from another computer without removing your tablet from the prompter.
Features – You want to make sure that anything you use will meet your needs. Ask questions like, “Can I use a controller with this?”, “Can I adjust the font size?”, or “Can I adjust the scrolling speed?” These little details can be something that can be useful as you’re creating content, especially if you’re working with a team or constantly filming in different locations.
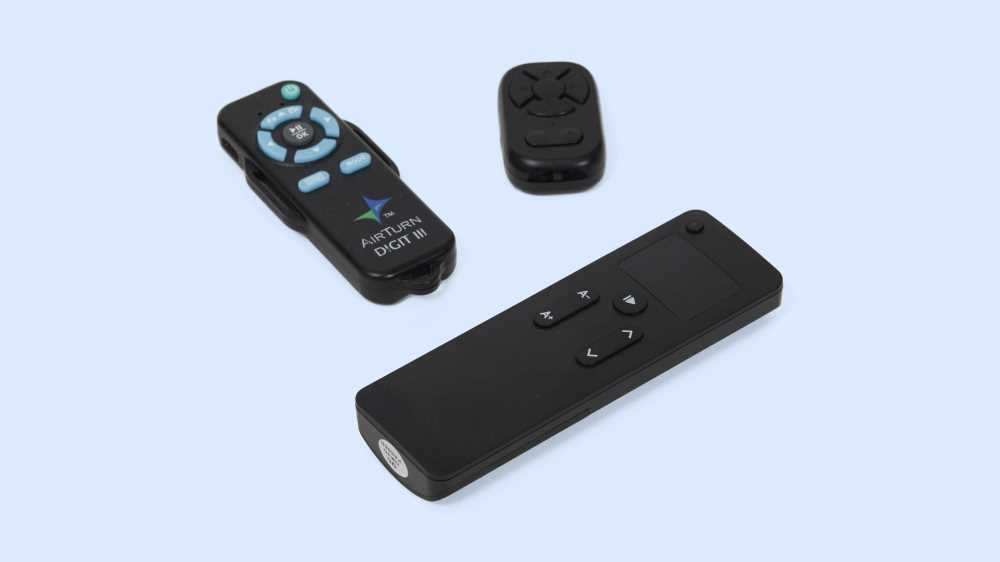
Controls
Unless you’re the kind of person who nails it on the first take, you’re going to need some way of controlling your teleprompter, whether you’re looking to speed up the text, slow it down, fast forwarding, or rewinding. You’d lose a lot of time having to adjust everything on the device itself, which is where controllers come in.
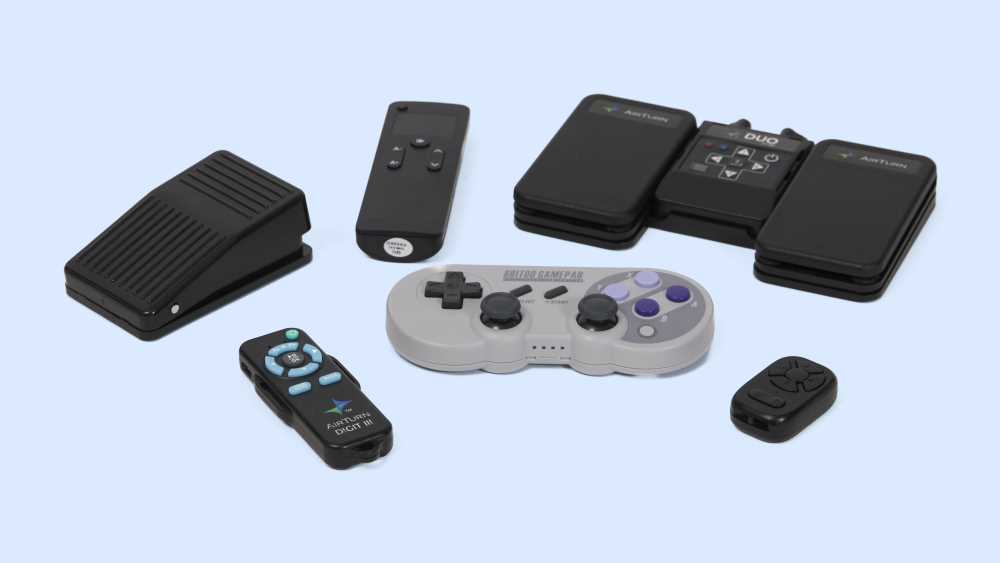
Most of the options you’re going to find are hand-based controls. These devices may look like a TV remote or have a scroll wheel similar to your mouse (in fact you can use a mouse for this purpose).
Foot pedals are also an option. These are a little more discreet than standard controllers. When it comes to foot controls, you’ve got a couple of options. Digital foot pedals use a switch that only has two states. It’s either pressed or not pressed. This style of pedal lets you play and pause the prompter with pedal presses, but that’s it. You can’t vary the play speed with this style of pedal.
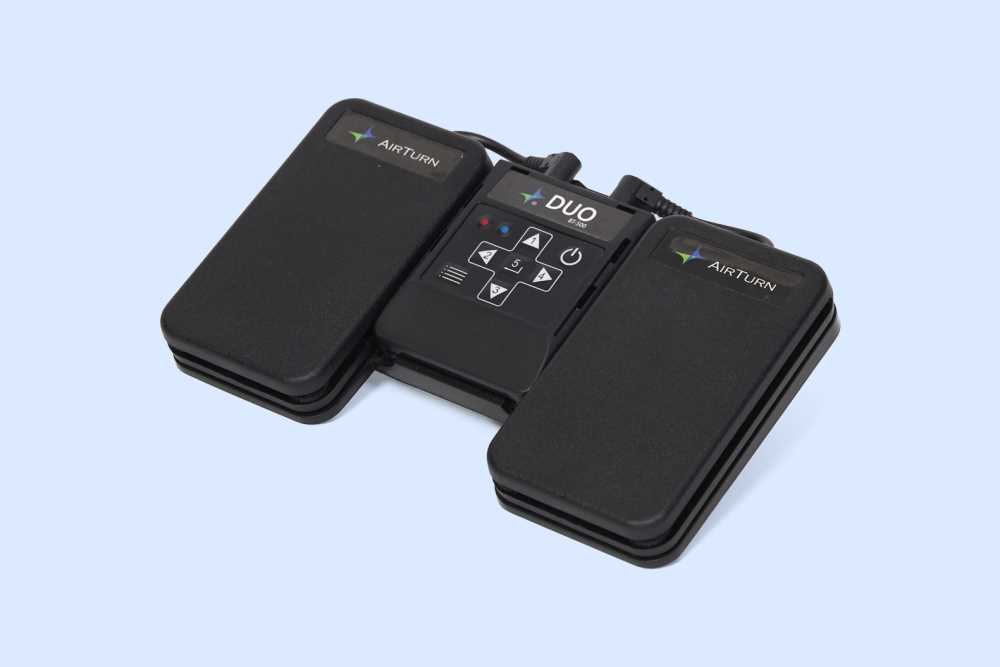
FluidPrompter’s analog foot pedal control, for example, allows for continuous and smooth adjustment of the scroll speed without thinking about it. This is by far the best way to control a teleprompter when seated and where you want your hands free for on-camera presentations. It operates like a guitar pedal. You can toggle it on and off with the switch and modulate speed using a pedal that moves like a gas pedal on a car. This helps you get the perfect text speed while recording (and lets you make adjustments on the fly).

The best teleprompters for your needs
We could spend all day talking to you about the different teleprompters and everything you need to consider when you’re buying one, but it can sometimes be more productive to look at specific teleprompters. Based on our experience, here are the best options out there right now:
PrompterPeople – Prompter People is a quality North American brand with in-country customer service and support including good ongoing repairability. You’re paying more for the quality and repairability, but it’s worth it.
Elgato Prompter – The best “at your desk” prompter for business meetings, sales calls, and webinars. Similar to PrompterPeople, you’re paying a bit more for the quality and repairability, but you get a prompter that is going to work harder for you.
SmallRig – SmallRig is the best value at an affordable price point for your first teleprompter. Among the unique features of this brand is the ability to insert 4″x5.65″ filters like a matte box. SmallRig is also the best prompter for removing your camera from the prompter without disassembling. This is a great choice for new YouTubers or content creators.
Desview T3 – The best compact prompter for use with a phone or small video monitor with a display size of 8″ or less. The mirror quality is respectable for its price point and I like the slide on protective over for the portable use (to protect the mirror).
GlideGear – This popular teleprompter brand is perhaps the best mid-tier option balancing price point and glass quality. It’s on the cheaper end for teleprompters brands that are headquartered in North American. The Glide Gear TMP100 is a stable for YouTubers around the world.
YC Onion – Unfortunately, the glass on the YC Onion “Lasagna teleprompter” has strong ghosting which can feel like you are reading from fuzzy double-vision text the whole time.
However, the YC Onion teleprompter remote is great and works with FluidPrompter! You can order the remote on its own without their teleprompter.
Ikan – A good step up from the entry level brands. Ikan is a solid North American brand that allows you to get a more robust teleprompter for scaling up production.
Neewer – A solid entry level brand. Neewer has lots of affordable teleprompters and related equipment to help you get the tools you need to make professional quality videos on a budget.
Worth noting is that the Neewer handheld bluetooth remotes work with FluidPrompter and have a good feel in the hand (physical size, distance between buttons, etc).
Need a bit more help figuring out what to get?
As you probably noticed, there’s a lot of factors you need to consider when you’re buying a teleprompter.
To help make it easier for you to narrow down your choices, we’ve built a selector tool. You input the details, it tells you what your best options are. If you’re ready to buy a teleprompter to create your videos, click here.